You
might have heard about the open dns service which gave more security
and more speed while browsing the web. Now Google too has come up with
their new Google Public DNS.
This service gives you more speed while browsing and also protects you
from DNS spoofing attacks and from various other security threats. This
one too look promising like the open dns.
If you don’t under stand what’s the use of it then just take a look at this.
As
web pages become more complex and include more resources from multiple
origin domains, clients need to perform multiple DNS lookups to render a
single page.
How To Set Up and Use Google Public DNS
The
average Internet user performs hundreds of DNS lookups each day,
slowing down his or her browsing experience. As the web continues to
grow, greater load is placed on existing DNS infrastructure.DNS lookups
can become a significant bottleneck in the browsing experience. Whenever
a client needs to query a DNS resolver over the network, the latency
introduced can be significant, depending on the proximity and number of
nameservers the resolver has to query (more than 2 is rare, but it can
happen).
How to Change DNS Server to Google Public DNS in Windows XP, Vista and 7
- Go the Control Panel.Click Network and Internet, then Network and Sharing Center, then Manage network connections.
- Select the connection for which you want to configure Google Public DNS. For example: To change the settings for an Ethernet connection, right-click Local Area Connection, and click Properties.
- To change the settings for a wireless connection, right-click Wireless NetworkConnection, and click Properties.
- If you are prompted for an administrator password or confirmation, type the password or provide confirmation.
- Select the Networking tab. Under This connection uses the following items, click Internet Protocol Version 4 (TCP/IPv4) (In Windows Vista and 7), and then click Properties.
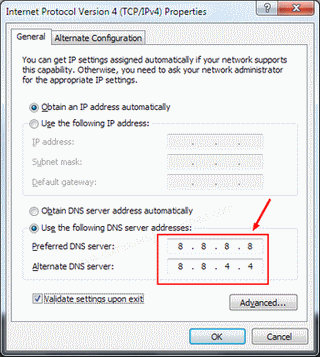
- Click Advanced and select the DNS tab. Select Use the following DNS server addresses.
Replace those addresses with the IP addresses of the Google DNS servers: 8.8.8.8 and 8.8.4.4.
Restart the connection you selected in step 3.
Xp users just need to take the Open Internet Protocol TCP/IP Settings.
Setting Google Public DNS in Mac OSX
- From the Apple menu, click System Preferences, then click Network. If you are prompted for an administrator password or confirmation, type the password or provide confirmation.
- Select the connection for which you want to configure Google Public DNS. For example:
To change the settings for an Ethernet connection, select Built-In Ethernet, and click Advanced. - To change the settings for a wireless connection, select Airport, and click Advanced. Select the DNS tab.
- Click + to replace any listed addresses with, or add, the Google IP addresses at the top of the list: 8.8.8.8 and 8.8.4.4.
Click Apply and OK.
[via Google Code]
Dont Forget To Comment Down Your experiences after New DNS Servers from google.

No comments:
Post a Comment